Distribution Statement
Extend GeoIPS with new Products#
This section discusses how to create multiple products for CLAVR-x data, specifically Cloud-Top-Height, Cloud-Base-Height, and Cloud-Depth. Products are the cornerstone plugin for GeoIPS, as they define how to produce a specific product as a combination of other plugins. Products use other plugins, such as an algorithm, colormapper, interpolater, etc. to generate the correct result.
We will now go hands on in creating a product for CLAVR-x Cloud-Top-Height.
First off, change directories to your product plugins directory.
cd $MY_PKG_DIR/$MY_PKG_NAME/plugins/yaml/products
Now, create a file called
my_clavrx_products.yaml, which we’ll fill in soon. Before we add any code let’s discuss some of the top level attributes that are required in any GeoIPS plugin:interface,family, anddocstring.
Please see documentation for additional info on these GeoIPS required attributes
Creating a GeoIPS Product Plugin#
The code snippet shown below shows properties required in every GeoIPS plugin, YAML or Class-based. These properties help GeoIPS define what type of plugin you are developing and also defines what schema your plugin will be validated against.
Copy and paste the code shown below into my_clavrx_products.yaml.
interface: products
family: list
name: my_clavrx_products
docstring: |
  CLAVR-x imagery products
Now we’ll update the spec portion of the yaml file to support our new product plugin.
spec is a container for the ‘specification’ of your yaml plugin. In this case, it
contains a list of products, as shown below. Denoted by the family: list
property shown above, this yaml file will contain a list of products, which can be of
length 1 if you so desire.
Copy and paste the code block below under your to the end of your file. spec should be right under the docstring you wrote, with no tabs behind it. YAML is a whitespace-based coding language, similar to Python in that aspect. Feel free to remove the comments, as they just describe what each property does.
spec:
  products:
    - name: My-Cloud-Top-Height # The name of the product you're defining (can be anything)
      source_names: [clavrx] # Defined as metadata in the corresponding reader
      docstring: | # Pipe says to YAML this will be a multiline comment, can be anything
        CLAVR-x Cloud Top Height
      product_defaults: Cloud-Height # See the Product Defaults section for more info
      spec: # Variables are the necessary variables which are needed to produce your product
        variables: ["cld_height_acha", "latitude", "longitude"]
To use the product you just created, run it through an Order-Based Processing
workflow. A workflow is a YAML plugin that lists the ordered
steps needed to produce output. You reference your product as a product step, and OBP
expands it into the interpolator/algorithm/colormapper steps its family defines. Workflows
live in your package’s plugins/yaml/workflows/ directory, and — when they include a
test section — double as regression tests.
Creating a Workflow to Visualize Your Product#
We’ll now create a workflow that reads your data and runs your product.
Change directories into your workflows directory.
cd $MY_PKG_DIR/$MY_PKG_NAME/plugins/yaml/workflows
Create a file called
my_cloud_top_height.yamland edit it to include the code block below (replace<your_package>with your package name).
apiVersion: geoips/v1
interface: workflows
family: order_based
name: my_cloud_top_height
docstring: CLAVR-x Cloud Top Height over CONUS.
package: <your_package>
spec:
  globals:
    product_name: My-Cloud-Top-Height
  steps:
    sector:
      kind: sector
      name: conus
    reader:
      kind: reader
      name: clavrx_hdf4
      depends_on: [sector]
    clavrx_My_Cloud_Top_Height:
      kind: product
      name: [clavrx, My-Cloud-Top-Height]
      depends_on: [reader, sector]
    filename_formatter:
      kind: filename_formatter
      name: geoips_fname
      depends_on: [clavrx_My_Cloud_Top_Height.algorithm, sector]
      arguments:
        product_name: My-Cloud-Top-Height
    output_formatter:
      kind: output_formatter
      name: imagery_annotated
      depends_on:
        - clavrx_My_Cloud_Top_Height.algorithm
        - clavrx_My_Cloud_Top_Height.colormapper
        - filename_formatter
        - sector
The product step references your product by [source_name, product_name]. OBP loads
the product and expands it into the ordered steps its family defines. The sector step
selects the region to plot on; depends_on wires each step to the output it consumes.
See The workflows interface for the full reference.
Rebuild the plugin registries and run your workflow:
geoips config create-registries
geoips run order_based my_cloud_top_height \
    $GEOIPS_TESTDATA_DIR/test_data_clavrx/data/goes16_2023101_1600/*.hdf
This will write some log output. If it succeeded it ends with a Return Value 0. Open
the resulting PNG file; it should look like the image below.
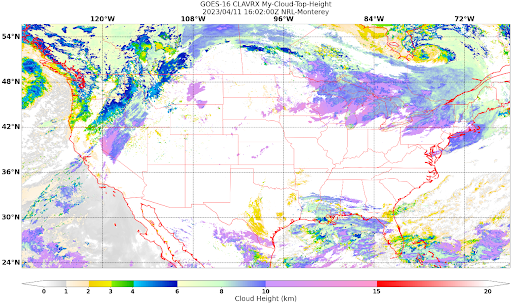
Okay! We’ve developed a plugin which produces CLAVR-x Cloud Top Height. This is nice, but what if we want to extend our plugin to produce Cloud Base Height? What about Cloud Depth? Using the method shown above, we’re going to extend our my_clavrx_products.yaml to produce just that.
Using your definition of My-Cloud-Top-Height as an example, create a product definition for My-Cloud-Base-Height.
cd $MY_PKG_DIR/$MY_PKG_NAME/plugins/yaml/products
- Now, edit my_clavrx_products.yaml. Here are some helpful hints:
The relevant variable in the CLAVR-x output file (and the equivalent GeoIPS reader) is called “cld_height_base”
The Cloud-Height product_default can be used to simplify this product definition (or you can DIY or override if you’d like!)
The correct products implementation for ‘my_clavrx_products.yaml’ is shown below. Hopefully, you didn’t have to make any changes after seeing this! Developing products, and other types of plugins should be somewhat intuitive after completing this tutorial.
interface: products
family: list
name: my_clavrx_products
docstring: |
  CLAVR-x imagery products
spec:
  products:
    - name: My-Cloud-Top-Height
      source_names: [clavrx]
      docstring: |
        CLAVR-x Cloud Top Height
      product_defaults: Cloud-Height
      spec:
        variables: ["cld_height_acha", "latitude", "longitude"]
    - name: My-Cloud-Base-Height
      source_names: [clavrx]
      docstring: |
        CLAVR-x Cloud Base Height
      product_defaults: Cloud-Height
      spec:
        variables: ["cld_height_base", "latitude", "longitude"]
Now that we have products for both Cloud Top Height and Cloud Base Height, we can develop a product that produces Cloud Depth. To do so, use your definitions of My-Cloud-Top-Height and My-Cloud-Base-Height as examples, create a product definition for My-Cloud-Depth.
cd $MY_PKG_DIR/$MY_PKG_NAME/plugins/yaml/products
- Edit my_clavrx_products.yaml. Here is a helful hint to get you started:
We will define Cloud Depth for this tutorial as the difference between CTH and CBH
interface: products
family: list
name: my_clavrx_products
docstring: |
  CLAVR-x imagery products
spec:
  products:
    - name: My-Cloud-Top-Height
      source_names: [clavrx]
      docstring: |
        CLAVR-x Cloud Top Height
      product_defaults: Cloud-Height
      spec:
        variables: ["cld_height_acha", "latitude", "longitude"]
    - name: My-Cloud-Base-Height
      source_names: [clavrx]
      docstring: |
        CLAVR-x Cloud Base Height
      product_defaults: Cloud-Height
      spec:
        variables: ["cld_height_base", "latitude", "longitude"]
    - name: My-Cloud-Depth
      source_names: [clavrx]
      docstring: |
        CLAVR-x Cloud Depth
      product_defaults: Cloud-Height
      spec:
        variables: ["cld_height_acha", "cld_height_base", "latitude", "longitude"]
We now have two variables, but if we examine the Cloud-Height Product Defaults
we see that it uses the single_channel algorithm. This doesn’t work for our use case,
since the single_channel algorithm just manipulates a single data variable and
plots it. Therefore, we need a new algorithm! See the
Algorithms Section to keep moving forward with this turorial.
Using Your Cloud Depth Product#
Note: Before moving forward in this section, make sure you’ve completed creating a new algorithm. We are going to modify our Cloud Depth product to use the algorithm we just created.
Now that we’ve created our cloud depth algorithm, we need to implement it in our cloud
depth product. As shown in the Product Defaults Section,
we can override the product defaults specified to our own specification. To do so,
modify My-Cloud-Depth product in my_clavrx_products.yaml to the code block shown
below.
interface: products
  family: list
  name: my_clavrx_products
  docstring: |
    CLAVR-x imagery products
  spec:
    products:
      - name: My-Cloud-Top-Height
        source_names: [clavrx]
        docstring: |
          CLAVR-x Cloud Top Height
        product_defaults: Cloud-Height
        spec:
          variables: ["cld_height_acha", "latitude", "longitude"]
      - name: My-Cloud-Base-Height
        source_names: [clavrx]
        docstring: |
          CLAVR-x Cloud Base Height
        product_defaults: Cloud-Height
        spec:
          variables: ["cld_height_base", "latitude", "longitude"]
      - name: My-Cloud-Depth
        source_names: [clavrx]
        docstring: |
          CLAVR-x Cloud Depth
        product_defaults: Cloud-Height
        spec:
          variables: ["cld_height_acha", "cld_height_base", "latitude", "longitude"]
          algorithm:
            plugin:
              name: my_cloud_depth
              arguments:
                output_data_range: [0, 20]
                scale_factor: 0.001
The changes shown above modify My-Cloud-Depth to use our my_cloud_depth algorithm
that we created. If we left this portion unchanged, My-Cloud-Depth would use the
single_channel algorithm, which is unfit for our purposes. We also added two other
arguments, output_data_range ands scale_factor, which override the Cloud-Height
product defaults arguments for those two variables. Output data range of [0, 20] states
that our data will be in the range of zero to twenty, and the scale factor says that we
are scaling our data to be in kilometers.
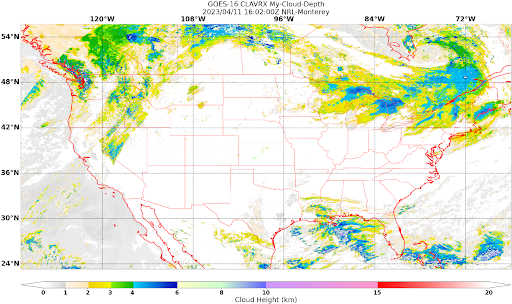
To use this modified My-Cloud-Depth product, follow the series of commands. We will be creating a new test script which implements our new changes.
cd $MY_PKG_DIR/tests/scripts
cp clavrx.conus_annotated.my-cloud-top-height.sh clavrx.conus_annotated.my-cloud-depth.sh
Now create a workflow for My-Cloud-Depth just like the my_cloud_top_height
workflow above — copy it to my_cloud_depth.yaml, change name to my_cloud_depth,
and change product_name and the product step to My-Cloud-Depth. Then run it:
geoips run order_based my_cloud_depth \
    $GEOIPS_TESTDATA_DIR/test_data_clavrx/data/goes16_2023101_1600/*.hdf
This will display Cloud Depth over the CONUS sector.
This will output a bunch of log output. If your script succeeded it will end with INFO: Return Value 0. To view your output, look for the output image path printed in the log. Open the PNG file to view your Cloud Depth Image! It should look like the image shown below.